Showing posts with label Craft. Show all posts

Wednesday, April 30, 2014

Felt Baby Booties

Nothing is sweeter than baby booties except perhaps the feet that go in them. 

Recently Peachie and her husband celebrated the first birthday of their little girl, Lucy.  While there is no lack of adorable clothing patterns out there, I decided to try my hand at booties.  After a quick stroll through pinterest, I found a very nice pattern from Heather Bailey.  Not only does her website offer tons of great crafting ideas, but I found her Bitty Bootie tutorial the easiest to follow.  But if you know me, I didn't really follow it...so here's what resulted. 

 
I did use her pattern which couldn't have been simpler. 

Because Lucy is already cruising, I used nubby, gripper fabric for the soles of the booties in addition to a layer of felt.  After cutting out the pieces, I sewed on the pink hearts and joined the back heel of the upper.  Then I added the pink stripe over the back seam.

I sewed, right sides together, the upper to the sole (both felt and gripper fabric together), all the way around and turned it right side out.  Lastly the white heart button was attached.  

Booties can be as simple or elaborate as you wish (just take a gander at pinterest).  The possibilities for embellishments are endless.  Embroidery could be added around the top edge, such as the classic buttonhole stitching, or ribbon lacings with bows on the toes.  A cotton or flannel print could be used for the inside sole.  My daughter suggested attaching jingle bells which is Grandma's tried and true method of keeping tabs on roving toddlers.  The best part is that these booties were quick to sew and new pairs can easily be made as those little piggies grow.  Many happy trails Lucy!

Friday, December 6, 2013

Vintage Baby Bowtie Quilt: Part One

Last year we were delighted to hear  the news that our very own Peachie was expecting! So around the holidays Bo Peep and I started planning. We worked our way through adorable baby quilt ideas on Pinterest, animals in hot rods, and vintage quilt blocks. Deciding upon color, size, and design requires a bit of thought. Eliminating some choices, such as color, no pink as requested by the Mommy-to-be, helped the process. Our "theme" would be child ( as opposed to baby) and hotrods, since this is a large part of the parents-to-be lifestyle.
 Materials on hand also factor in the design. Digging through our fabric stashes revealed reds and soon we were envisioning a monochromatic quilt with a beautiful redwork centerpiece. 
Division of labor would be a little tricky since Bo Peep and I live some distance apart. We decided embroidery would be my department while Bo Peep manned the quilt blocks.
So I set to work.....

Inspired by a 40's children's record, I sketched up a design and transferred it.

I choose pearlized cotton floss in a classic red.
 This floss is not divided and there for is more substantial for a design of a larger size.
 
Satin stitches of varying widths create interest and depth.


Redwork dates from 1880's to the 1920's. Red was used (and sometimes blue) on muslin as it was available in a sturdy cotton. Other colors were only available in silks. No DMC floss in those days!
The centerpiece was finished! Time to send it off to Bo Peep.....


Thursday, December 13, 2012

The Butterfly Project

Pinterest can be a blessing, and a curse, but today we will focus on the blessing side. I can type some words in the search box and poof! Millions of ideas coming at me. I try to make my niece's gifts since I can, and it gives it a more personal feel, I think. So for her birthday I recalled a conversation with her mother about how she couldn't reach her favorite book/toy in the vehicle. I did find back-of-the-seat caddy examples, but I wasn't impressed with their style or lack of.  The possibilities were endless, so I posed the question to my niece: crown, heart, owl, or butterfly? She picked the latter so off I went. First thought, perhaps I could use up some more of the pink corduroy in my sewing room? But what to go with the pink? It was hard to stop myself in the batik section of the fabric store (perhaps you are familiar with my obsession?). These fabrics mimicked the spots on monarchs and although this is a smaller project, I needed, okay wanted, to get  all six of them in. Templates are easy to find on the Internet. While the boys did school work one evening, I drew a simplified template of a monarch on newsprint using the template as a guide.

I borrowed their crayons (I still love coloring!) and blocked in the colors by how many fabrics I had chosen.  I then traced out the pieces in tracing paper.
Since I made this up out of my head, I needed to sit down and scratch out pattern directions to save me the time of stopping after each step to decide what to do next.
I decided to section out four quilted pockets on the butterfly with the batik patterns on them, and use the pink corduroy as backing.
In this project I fell in love with Heat n Bond Lite, as it made the pieces so nice and neat and easy to applique, which was especially helpful with the small pieces.
I couldn't help but lay it all out every two seconds and look at it.  So exciting!

I appliqued with variegated thread.
I quilted between the sections of orange.


I backed the pockets with batik and used some sparkly tulle to make a pocket on the body of the butterfly. To attach the butterfly on the chair, I sewed webbing with an adjustable buckle to the top corners of the wings. I also brought in some pink from the back by adding some spots around the perimeter of the butterfly.
All finished and stuffed with goodies! I must admit it turned out better than I expected, and now I want one. I still think it would be fun to make an owl one, too! Maybe one for my youngest niece in a few years?
This would make a great Christmas gift as well, and does not take too much time to make depending on your shape choice.

Monday, October 8, 2012

Knitted Cowlneck Scarf

So funny story...Wild Kat sends me an email saying, "Would you knit me a cowlneck scarf?  And in return I'll pinstripe your Singer sewing machine case?"  "Heck, yeah!!" I replied.  So she writes, "I'll get the yarn and needles in the mail to you this week."  Excellent.

Fast forward three or so days when the family and I return home from an outing and find the dog contentedly chewing on something unidentifiable.  "What did Bosley pull out of the garbage this time?" wonders my husband out loud, as he bends down to retrieve a tangled wad of gorgeous pale green yarn and some scraps of what used to be the box it came in.  Let's suffice it to say that the dog got a sound tongue lashing and spent some time in the kennel while I went in the house to sort out the pieces.  Miraculously the yarn was tangled but not destroyed, and the pattern sheet was crumpled but still legible.  Total disaster avoided!


So over the next few nights I worked up this oh-so-soft baby alpaca yarn into a cowlneck scarf.


The pattern that Kat sent was one of those freebies from JoAnn Fabrics.  You know the ones that they have hanging in the isles?  I love patterns that have only five lines of directions!  Admittedly I'm a better crocheter than knitter, but this whipped up in no time (although I did refer to Stitch 'n Bitch to brush up on my circular knitting basics). 


And here you have it.  A warm and snuggley cowl that I will get out in the mail to Kat...one of these days...I promise.  And I'll be sure to show you my Singer sewing machine case all decked out in gold pinstriping!  

So the moral to this story is twofold:  If you can't do it yourself, barter for it.  And secondly, don't ever assume your dog won't eat yarn and knitting needles.

Monday, July 23, 2012

DIY : Cupcake Pin Cushion

So you know how it goes when you visit a particular shopping website looking to buy one specific thing, and you decide to check the clearance section...just in case...?  I did that a couple weeks ago at Nancy's Notions.  I had to buy outdoor upholstery to recover patio cushions for my brother, but found this adorable cupcake pin cushion kit on sale! 

Now Peachie is a weaver of cakes.  I mean that both figuratively as she can work magic with buttercream and literally as she has arrived at HVG functions with layer cakes covered in basketweave frosting.  So this project immediately made me think of her.  But then I needed an occasion to gift this...I finally decided that both she and Wild Kat *needed* a pin cushion as a thank you gift for helping me out with the Miss Symco Pin-Up Contest next month.


To begin, I should say that I did not follow all of the directions included in the kit (bad habit of mine).  I had my kids save their Greek yogurt containers to use as the base.  The cupcake paper was made from a 3 1/2 inch wide strip that I sewed several pleats into.  The pleats are set approximately one inch apart, 1/8 at the top widening out to a 1/4 at the bottom.  The strip is then wrapped around the cup and sewn together to make a tube.

I glued the bottom edge to the cup, making sure that all the pleats folded in the same direction.  Then I cut out a circle to make a yo-yo for the bottom.  Simply run a basting stitch around the outside edge of the circle, gather it in until it is the size that you need to cover all the raw edges and press.  I stitched this onto the bottom of the cupcake by hand.

I put a large rock into the cup to add weight and filled the rest with poly-fill.  Another yo-yo in chocolate brown, gathered around the outside edge, will form the cupcake top.  All my yo-yos were made by tracing saucers that seemed to be the right size.  Aside from not following directions, I also don't fuss over the details too much!

After the chocolate top is fitted onto the base, I pinned and hand-stitched the two together. 

Finally, I was down to the decorating.  My daughter really wanted me to follow the directions and do ruffled frosting, but I wasn't sold on that.  When I came across an embroidered peach patch in my sewing basket, it was a no-brainer. 

So yesterday when we all got together for a car show, Peachie received the peach chocolate cupcake and Wild Kat, the cherry chocolate one.  We're three weeks out from the pin-up contest, and I have to make sure my girls are happy!  Honestly this was a fun, quick project.  And since I don't need any more pin cushions, I was glad to know that these will be put to good use.  Now I need to decide if I should sew up a new outfit for the contest...or keep working on the seat covers for my '50 Ford...?

Saturday, May 19, 2012

Hometown Teacher Gifts

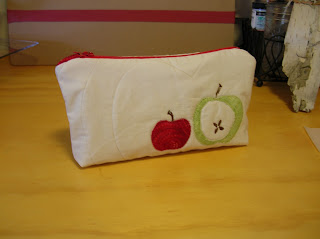
In the beginning of the school year, children often bring their teacher an apple or other small gift as a token to start off the school year right. By the end of the year the children have formed a better relationship with their teacher, and it is often hard to take that summer break knowing it will be all new next year. For a good bye teacher gift,  I wanted to custom design gifts for the boys' teachers. Producing good ideas can be tough and finding time to carry out these ideas even tougher. I  have a head start on two out of the three teachers. Pencil holders/make-up bags stuffed with pencils, lip balm, and other goodies are a gift I would love so I think they will be a hit with the teachers. Plus this project uses up scraps, have I mentioned before how much I love that? I only purchased zippers for this project, making this a very affordable gift.

I found a tutorial online, and decided to spend my time on the design. This tutorial uses iron on vinyl. Vinyl lining is great for a a make-up bag and recommended for a pencil bag, but if it is not readily available you can skip it. Mine is made of cotton and quilted so it can be thrown right into the washing machine. A previous gift of a personalized notepad with an apple design was the perfect inspiration for the make-up bag/pencil holder.
Perhaps you remember these fabrics from my Hawaiian potholders project?


Applique, embroidery, and echo quilting on the front,
Installing the zipper looks intimidating but is actually quite easy. You will want to plan out your design because assembling the bag is last and goes quickly!

 Quilting the back with a coordinating colored thread to adds to the uniqueness.

 A small pocket inside to stash your smaller valuables.

Make one for a teacher, mother, friend, or yourself. A monogram would be beautiful as well.
Stashed full of goodies and ready to give.

I plan to make one with cherries for car shows,... you know.... to stash my essentials. Lipstick, compact, band-aids, sunscreen, flask *wink wink.*
I love these cherries!


I'm on a roll, so I better start on the next gift for teacher. School is almost out!

Friday, March 16, 2012

Revamped Peacock Hat


This past winter I purchased a black felt hat at the local thrift store.  It was too big for me and almost came down over my eyes, but it had potential.  After staring at it for a week or so, I grabbed the shears!

I started by trimming off a healthy two inches.  Then carefully shaped the edge (quarter inch at a time) to fit my head and sit down against my curls.

Because it was still a bit big, I cut out two small slices at the edge to form a dart or tuck.  One is in the center back and the other lands on the right side (which will be covered by the decoration later).  Closing up these darts snugged in the brim just enough.
I sewed a length of polyester satin (leftovers from my gold skirt) to the cut off felt to make a trim piece.  I pinked the seam down to a quarter inch.  This seamed edge will form a piping.
The gold fabric is wrapped around and under the salvage edge, forming the piping.  The trim piece is attached to the brim by simply overlapping and stitching in the ditch.
Back on the hat stand (aka. milkglass flower vase) to decide the next move.  The new black band was too wide as it was.  I thought scallops would be pretty, but wasn't confident in my ability to cut them consistently so I opted to trim it down to the same width as the gold piping.
The decoration was applied over the side dart.  I hot glued the peacock feathers in place and sewed on a vintage coat button to cover the hot glue.  Also, on either side of the brim, I tacked in bobby pins with a couple small stitches to anchor the hat to my head. 
While I really like the look of the over-the-top, ostentatious hats, they don't fit my personality.  I tend to wear the low profile hats that snuggle down into my curls.  Hence, I seem to have a lot of beanies!

So now I have a hat to coordinate with my gold skirt and peacock sweater.  Must talk to the Mister and fabricate an occasion to wear this ensemble! 

Friday, March 9, 2012

The Art of Gift Giving

I love giving gifts, and almost equally, I love wrapping gifts.
Seriously,..... if I could wrap gifts for a living I would be a happy girl. Some people cringe at the thought of wrapping gifts while I delight in finding that perfect ribbon. There are tons of cute gift bags out there but I prefer something more original.
 There's nothing like a satin ribbon to tie up any gift beautifully.
Any time I cook a whole chicken I save the wishbone for wedding or baby gifts. Painting or adding glitter to a wishbone makes any gift extra special.

A glittered wishbone on a baby quilt is an elegant touch.
I also love to reuse/recycle wrapping items. I often use brown paper and let the kids decorate the paper with drawings and stickers for birthday gifts.
 Strips of newspaper make a cute bow on these gifts. A newspaper, scissors, and stapler is all that's required to make this eco-chic bow.
Homemade gifts are the best in my opinion, and they can be stand out gifts with a little attention. I love this idea for your homemade preserves as gifts.

Available on etsy, or make your own custom labels.
Green jalapeno jelly and red strawberry jam tied with gingham ribbon in a basket is a charming Christmas gift.

There are many options for tying up a gift, yarn twine, ribbons, just look around your home for some inspiration.
A container can also be part of the gift. Antique stores and garage sales are excellent places to find containers for your gifts. Enameled boxes make great containers for kitchen/food gifts.

Fill with brownies or a peek a boo towel!
Keep in mind what the recipient's interests are and what type of gift you are giving. A galvanized bucket filled with shop supplies and tied with cotton twill tape would make a great gift for the guy who loves to spend time in his garage.
What ever gift you choose have fun wrapping it, or find someone who enjoys wrapping as much as I do!

Sunday, January 15, 2012

Penny Mats

I have been eyeing up this cute penny mat along with an adorable strawberry penny mat at my local fabric store for awhile, and finally last fall I broke down and bought a kit. Now being my first I had a few assumptions with were wrong(big surprise right?). I knew they did the sample at the store with a machine but I assumed it would be very quick to sew by hand. Now it didn't take me a long amount of time, but it did take me longer than I originally thought. I also assumed that penny mats were for dumping you pennies on, again, wrong! Penny mats were originally made of penny size scraps of leftover wools/fabrics. Even if they weren't penny shaped it did use up some wool scraps.

I also brushed up on my embroidery skills, the majority of the stitching was blanket stitching, but there was also some french knots for the eyes and lazy daisy stitches for the flowers. If you find yourself needing a refresher you tube has great videos for this. I also learned a nice trick, after mentioning to the fabric store owner, I was stitching on the sheep and finding it difficult to keep them flat since the pieces were too small to pin down, she suggested some fabric-tac. Hello! worked like a dream.


 Here is the backside, really pretty in whimsical way, but I covered it to prevent unraveling or catching of the threads.
Very sweet, I think, and I am ready to make another one. Starting with a kit for my first try was great and now I'm ready to design my own. I'm envisioning cherries or a hot rod for my guy to throw his pennies on!
Happy Sewing!
Kit: Buttermilk Basin August Penny Mat @ http://buttermilkbasin.com/
Supplies: The Cutting Edge Fabric and Craft Supply Shoppe LLC. 816 5th Ave. Antigo, WI 54409 715-623-3590

Saturday, January 7, 2012

Pillow Talk

In my caffeine-induced frenzy yesterday, I whipped up two new couch pillows.  To make the covers, I found heavy cotton scraps left over from various sewing projects (ironing board cover, striped tote bag, plaid jumper, floral tablecloth for my daughter's playhouse).  The pillows themselves are feather-filled and perfect for sleeping in front of the tv.
 I used a basic pinwheel pattern from my quilt book, constructing four 2-piece triangles (per pillow) and then sewed the large triangles together.
The back opening is a simple overlap.  I cut two sides that extend to approximately 2/3 the full width of the pillow.  In this case the pillow measures 21" square, and the back sides are 16" wide.  I hemmed the opening edge.  The pillow stays tucked in nicely, and the cover can be removed for washing.  
No need for zippers or buttons!

Mission oak chair that my hubby reupholstered.
I also finished up a pair of pillows I made for my niece.  The fronts are knitted from chunky, chenille yarn and sewn to a fabric foundation.  The back is made the same as above.  These measure only 12inches square and worked up fast on size 17 needles!  Like knitting with wooden spoons!
These dandies should make some stellar marks on her face while she's sleeping!

Pillows make great gifts (I've done it several times).  So easy to find fabric and styles to match whomever you have in mind!  And in my case, pillows are like hotpads.  They get used to death and new ones are such a treat!