Showing posts with label Christmas. Show all posts

Wednesday, February 12, 2014

The Power of Attraction

I am a firm believer in the power of attraction, and along with that the idea that whatever you focus on expands! Within the last year alone I have acquired a vintage mohair couch and club chair, turntable, fridge, and camper! But this is not solely about purchasing items you like, it's how things come to you in unexpected ways. I think the best example of this is my vintage aluminum canister set. My neighbor gave me a canister set she found in her cabin, and though I was in love with it, it was missing the sugar canister. No matter, I loved them and cleared the clutter (my huge microwave) to make room for them.

 After seeing my canister set on Facebook, my cousin's friend contacted me and told me she had a sugar canister that she thought matched  for me. I picked it up and indeed it did match! A beautiful canister set that came to me for only the price of gratitude.
Just added-S & P set from antiquing in Hixton.

Soon afterwards, my mother gifted me this spice set too!


This holiday season was a particularly delightful one for me. I had decided to cut out the stress of gift giving by not pressuring myself to get the perfect gift. You know what? I do believe that everyone got a well-suited gift from me this year. I also received well-suited gifts this year. The following are a few of my favorite gifts!

Daddy-O got me this gorgeous vintage blue coat!
 Blue is my favorite color, which you don't see too often.
I think this gift was for Daddy-O, but I'm claiming it as mine!
My brother made me a beautiful wooden tray and this vintage sign that goes perfectly in our newly remodeled breezeway.
Good Luck
Compliments of T J Wirrer
General merchandise
Mattoon, Wis.
Bo Peep found this plate in Waupaca brought it home to Mattoon, and fits perfectly in my "new" living room!


Last spring I bought some rocks and shot glasses from my late Great Uncle's estate. I didn't even know other sizes existed until I spied Rebecca's Collins and highball glasses at Mississippi Mayhem! I always gravitate towards glass at any thrift store, but no matching glasses were to be found. Then I received an early birthday present from Bo Peep.
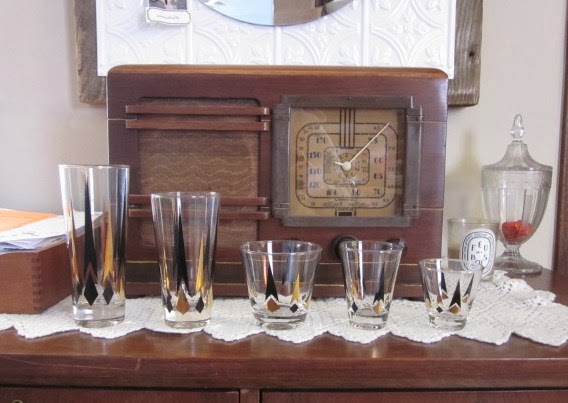
Tom Collins, Highball, Old Fashioned, Rocks, and Shot.

Imagine my delight when I spied the glasses as I opened up the box! Now my mismatched glasses are gone to make way for my beautiful "new" set! Even though they are bar glasses I plan on using them as kitchen glasses. I delight everyday in using these beautiful glasses, and there's no reason to store that joy away!

And would you know it, now I noticed Annie has some too! My focus is expanding.

My mother gave me some of my Great Aunt Helen's lovely jewelry which includes Mount Rushmore sweater clips! Now I am reminded of her whenever I wear one of these.
 I have received many more great gifts, and love witnessing the power of attraction in my life. It never gets old. And if you're wondering what all this power of attraction talk is, I have been reading E Squared by Pam Grout. I highly recommend it!

Wednesday, December 26, 2012

Christmas Hangover

Have a little too much fun for the holidays?
Perhaps you have to struggle through work today as well?
Fortunately, and planned, I have a few days off of my day job, so this morning is being spent sipping a hot cup of tea in my jammies. Now there are plans to catch up on laundry and dishes today, and tomorrow we will make the trip to exchange a few gifts and restock on batteries in town, but for now I will take stock in this holiday.
Santa using sacs to deliver presents mean less garbage and rested elves!


Some highlights include Santa bringing toys in Santa sacs. These sacs are great for several reasons, the first one being they look great! Saving trees and time spent wrapping are two more great reasons. I am considering making Santa sacs for a few more people next year. I do love wrapping gifts, but I doubt I would ever get away from that. Even if you use reusable containers to wrap gifts you can still add some pretty ribbons and accessories.
Teacher gifts including a few handmade goodies.

Another highlight for me was not baking. Now before you think anything, I did indeed do some baking but it was very limited. Two cookies for a classroom treat, and this pretty little treat for a birthday classroom treat. I do enjoy baking but only when I have time, and not stressing myself out making a million holiday treats was a delight. Besides, between my customers/friends bringing me cookies and treats, I was far from sugar deprived.
On the same note, I did not make many handmade gifts. As much as I love making gifts I was realistic about my time this holiday season. Only three gifts were handmade this year! I can hardly believe that myself.
Handmade angel wing caps (made from an old bra) for my niece.

All this made for a relaxed enjoyable holiday. I also had more time available for last mintue requestes, one Mrs. Claus outfit, and birthdays. Balance of time is a big accomplishment for me, so maybe I will celebrate my restraint on New Year's eve. If you indulged a little too much this Christmas, relax you still have time to add some new years resolutions to your list!
Happy Holidays!

Thursday, December 13, 2012

The Butterfly Project

Pinterest can be a blessing, and a curse, but today we will focus on the blessing side. I can type some words in the search box and poof! Millions of ideas coming at me. I try to make my niece's gifts since I can, and it gives it a more personal feel, I think. So for her birthday I recalled a conversation with her mother about how she couldn't reach her favorite book/toy in the vehicle. I did find back-of-the-seat caddy examples, but I wasn't impressed with their style or lack of.  The possibilities were endless, so I posed the question to my niece: crown, heart, owl, or butterfly? She picked the latter so off I went. First thought, perhaps I could use up some more of the pink corduroy in my sewing room? But what to go with the pink? It was hard to stop myself in the batik section of the fabric store (perhaps you are familiar with my obsession?). These fabrics mimicked the spots on monarchs and although this is a smaller project, I needed, okay wanted, to get  all six of them in. Templates are easy to find on the Internet. While the boys did school work one evening, I drew a simplified template of a monarch on newsprint using the template as a guide.

I borrowed their crayons (I still love coloring!) and blocked in the colors by how many fabrics I had chosen.  I then traced out the pieces in tracing paper.
Since I made this up out of my head, I needed to sit down and scratch out pattern directions to save me the time of stopping after each step to decide what to do next.
I decided to section out four quilted pockets on the butterfly with the batik patterns on them, and use the pink corduroy as backing.
In this project I fell in love with Heat n Bond Lite, as it made the pieces so nice and neat and easy to applique, which was especially helpful with the small pieces.
I couldn't help but lay it all out every two seconds and look at it.  So exciting!

I appliqued with variegated thread.
I quilted between the sections of orange.


I backed the pockets with batik and used some sparkly tulle to make a pocket on the body of the butterfly. To attach the butterfly on the chair, I sewed webbing with an adjustable buckle to the top corners of the wings. I also brought in some pink from the back by adding some spots around the perimeter of the butterfly.
All finished and stuffed with goodies! I must admit it turned out better than I expected, and now I want one. I still think it would be fun to make an owl one, too! Maybe one for my youngest niece in a few years?
This would make a great Christmas gift as well, and does not take too much time to make depending on your shape choice.

Wednesday, December 28, 2011

Cream Cheese Spritz Cookies

Quick! Before the New Year starts and you have to buckle down on that pesky new diet resolution, treat yourself to a batch of cream cheese spritz cookies.  I used a recipe from the original book that came with my 1950s press.


1 C shortening
8 oz cream cheese
1 C sugar
1 teas vanilla
3 1/2 C flour

Combine all ingredients in order listed.  Add food coloring to tint before adding flour.  Fill cookie press and drop on ungreased cookie sheet.  Decorate with sprinkles, colored sugar or red hots as desired.  Bake 375degrees for 8-10 minutes.

Betcha can't eat just one!  (or six, for that matter)

Monday, December 19, 2011

Christmas in Hollywood

It's always a bit hectic during this last week before Christmas, trying to get everything done and not lose the joy of the season.  So here are a few tips from your favorite Hollywood Starlets.

1.  When in doubt, hang more tinsel!

 2.  Do not shake your presents, no matter how tempting.

3.  Burn off those cut-out cookies with a little ice skating.

4.  Always take a moment to double check your lists.

5. Give Santa extra hugs.  It can't hurt!

6.  Decorate all sides of the tree.

8. Brush your hair Christmas morning to be ready for family photos.

9. Make sure your stocking is generous in size.  You never know what may be in it!

Friday, December 9, 2011

1950s Christmas Cards

Emily Post writes in the 1943 edition of her infamous book, Etiquette;

"The ever-increasing impulse to send out Christmas cards as messages of friendship and goodwill is plainly not a mere caprice of fashion, but evidence of a country-wide trend toward a broadened and more friendly social relationship."

Oh, if Mrs. Post only knew how broadened and social we've become these days!  Imagine my joy when I recently purchased five Christmas cards (for a mere $1) dated from 1944 to 1962
The oval illustration is printed on silk and padded.
A piece of real lace trims her skirt.
All the cards are addressed to "my wife," all signed "from your honey" and all dated with the year. So sweet. You know these were sitting in a shoebox, in some woman's closet, for years.  A few had water stains and crumpled corners, but this kind of sentiment should not be put back in a box.
I decided to use my three favorite and put together a frame.  I covered the background with fabric, simply taped on to the back side, and used long stickpins to secure the cards.  The pins are stuck behind the folds of the paper or, in one case, the pinhead is hidden within the illustration.  Then I added a little bunch of plastic mistletoe tied with a black velvet ribbon.
A frame like this can be done using any sort of vintage cards, magazines, recipes, paper dolls, sheet music or photos; the possibilities are endless.  So don't shy away from all that vintage ephemera!  Use it to decorate your house.  And don't forget to save your own cards and papers.  Someday your kids will hang it on their walls!

Sunday, December 4, 2011

Christmas Gifts-Victory Girl Style! Part 2


From left, Breadfruit, Protea, & Pineapple
Finishing the potholders has been a bit of a challenge, but that's what makes it fun, no? My last step was quilting down the outline. Once that was finished I got to work quilting down the inside.

This is not hard but tedious work that makes the potholder stand out! After completing the inside I stitched a few lines out side the design on the white background. My tip here is to put white thread on your machine but leave the red in the bobbin. This way there will be no contrasting stitching on the front or back.
I have come to the conclusion that I am way too much of a perfectionist to ever like binding. I would rather put in a zipper any day, BUT practice makes perfect, and lots of it I will have! My first attempt to bind a square potholder ended in a date between myself and the seam ripper. So rounding the corners seemed like a good solution. The binding went on much better. After washing out the blue marker here is my finished work!

Looks great, now the race is on to finish the other five before the Christmas Bake Sale!
Happy sewing gals!
I finished them with only a day to spare but here they are!
All tied up and ready to gift!

Saturday, November 19, 2011

Christmas Gifts- Victory girl style!

I am unsure of your timetables but mine go something like this- I work in two modes, #1 I have plenty of time I can do it later, and #2 I can't believe it's that time already! (picture me a mess here). I decided that although we have not yet passed up turkey day, I might enjoy being ahead on a project so tonight I will start them! I am going to make potholders. I would love to make these for all my friends and family, okay so maybe I better scale that back some. Two sets seems possible. One of them will be donated to school for the Christmas program and the other set...well I may have to keep it. Initially I dreamed up hawaiian quilted potholders in holiday colors, but I wanted something that could be used year round as well. A little internet browsing brought up three designs that could be done in holiday and everyday colors.  A trip to my local quilt store was in order since I would need not only my fabrics but the insulated batting. Printed out designs in hand, I ordered up a stack of colored cottons in the same pattern as to add to their cohesiveness. I'm a bit nutty that way.
Due to the fact that my scanner is on the fritz, I figured it would be easier to cut out some newsprint in an 8x8 block, fold it on the diagonal, and sketch the design out.

The breadfruit leave in green, protea in red, and pineapple in gold.
 My materials for this project are as follows- 12 blocks(8"x8") of each color, 12 blocks of insulbrite batting, 6 blocks of regular cotton batting, and 6 blocks of bleached muslin(background).
Next I placed my appliques on my white blocks and basted them down, however Heat n Bond works well too if you have some. In the interest of my sanity I will be machine quilting these, follow your machine's directions for the applique stitch.
Like lovely layers of a cake we have from top to bottom: color applique block, insulbrite, batting, insulbrite, and backing fabric. The insulbrite does have a "shiny" side that needs to face out and I included two layers so either side of the potholder could be used.

After removing the basting and pressing until perfectly flat, I used my french curve to draw out the quilting lines on the inside of my protea. After this I will not be pressing again until the blue lines have been washed out.
Lesson learned..again. Skipping steps does not always save time!
My alter ego, Wonder Woman, thinks she will finish these in one evening-yeah right! I attempted quilting  all those layers with four pins and no basting and now I will be spending some time with my seam ripper. The layers shifted, so I used alot of pins through out the layers. I also started at the top of the protea applique going down both sides instead of starting from the bottom, which eliminated the wrinkles you see on the right block.
Well Wonder Woman, it seems you and I will be spending another evening together to finish these. Assembly line sewing does seem to take much longer, but when you are finished you have six potholders!!

I hope you have started your handmade gift projects and may you get all of them done!

Stay tuned the the finishing of this project and coming soon, Part 2 of my dining room redo!