Showing posts with label Quilting. Show all posts

Saturday, January 11, 2014

Vintage Baby Bowtie Quilt: Part Three

Here it is!
 The quilt was finished! 
Beautiful!

BoPeep sewed her beautiful bowtie blocks together and added a border to balance it.  She machine quilted around each bowtie and the center embroidery.  Then it was delivered it to me to finish.

Some finishing touches included hemming the binding by hand


and embroidering a dedication label.


The back is just as stunning as the front.
We used a soft chambray for the binding and backing.

I added glittery wrapping....

Glitter makes everything grand!


...then sent it off to Lucy with love!

 Lucy and her quilt.


Friday, December 6, 2013

Vintage Baby Bowtie Quilt: Part One

Last year we were delighted to hear  the news that our very own Peachie was expecting! So around the holidays Bo Peep and I started planning. We worked our way through adorable baby quilt ideas on Pinterest, animals in hot rods, and vintage quilt blocks. Deciding upon color, size, and design requires a bit of thought. Eliminating some choices, such as color, no pink as requested by the Mommy-to-be, helped the process. Our "theme" would be child ( as opposed to baby) and hotrods, since this is a large part of the parents-to-be lifestyle.
 Materials on hand also factor in the design. Digging through our fabric stashes revealed reds and soon we were envisioning a monochromatic quilt with a beautiful redwork centerpiece. 
Division of labor would be a little tricky since Bo Peep and I live some distance apart. We decided embroidery would be my department while Bo Peep manned the quilt blocks.
So I set to work.....

Inspired by a 40's children's record, I sketched up a design and transferred it.

I choose pearlized cotton floss in a classic red.
 This floss is not divided and there for is more substantial for a design of a larger size.
 
Satin stitches of varying widths create interest and depth.


Redwork dates from 1880's to the 1920's. Red was used (and sometimes blue) on muslin as it was available in a sturdy cotton. Other colors were only available in silks. No DMC floss in those days!
The centerpiece was finished! Time to send it off to Bo Peep.....


Thursday, December 13, 2012

The Butterfly Project

Pinterest can be a blessing, and a curse, but today we will focus on the blessing side. I can type some words in the search box and poof! Millions of ideas coming at me. I try to make my niece's gifts since I can, and it gives it a more personal feel, I think. So for her birthday I recalled a conversation with her mother about how she couldn't reach her favorite book/toy in the vehicle. I did find back-of-the-seat caddy examples, but I wasn't impressed with their style or lack of.  The possibilities were endless, so I posed the question to my niece: crown, heart, owl, or butterfly? She picked the latter so off I went. First thought, perhaps I could use up some more of the pink corduroy in my sewing room? But what to go with the pink? It was hard to stop myself in the batik section of the fabric store (perhaps you are familiar with my obsession?). These fabrics mimicked the spots on monarchs and although this is a smaller project, I needed, okay wanted, to get  all six of them in. Templates are easy to find on the Internet. While the boys did school work one evening, I drew a simplified template of a monarch on newsprint using the template as a guide.

I borrowed their crayons (I still love coloring!) and blocked in the colors by how many fabrics I had chosen.  I then traced out the pieces in tracing paper.
Since I made this up out of my head, I needed to sit down and scratch out pattern directions to save me the time of stopping after each step to decide what to do next.
I decided to section out four quilted pockets on the butterfly with the batik patterns on them, and use the pink corduroy as backing.
In this project I fell in love with Heat n Bond Lite, as it made the pieces so nice and neat and easy to applique, which was especially helpful with the small pieces.
I couldn't help but lay it all out every two seconds and look at it.  So exciting!

I appliqued with variegated thread.
I quilted between the sections of orange.


I backed the pockets with batik and used some sparkly tulle to make a pocket on the body of the butterfly. To attach the butterfly on the chair, I sewed webbing with an adjustable buckle to the top corners of the wings. I also brought in some pink from the back by adding some spots around the perimeter of the butterfly.
All finished and stuffed with goodies! I must admit it turned out better than I expected, and now I want one. I still think it would be fun to make an owl one, too! Maybe one for my youngest niece in a few years?
This would make a great Christmas gift as well, and does not take too much time to make depending on your shape choice.

Saturday, May 19, 2012

Hometown Teacher Gifts

In the beginning of the school year, children often bring their teacher an apple or other small gift as a token to start off the school year right. By the end of the year the children have formed a better relationship with their teacher, and it is often hard to take that summer break knowing it will be all new next year. For a good bye teacher gift,  I wanted to custom design gifts for the boys' teachers. Producing good ideas can be tough and finding time to carry out these ideas even tougher. I  have a head start on two out of the three teachers. Pencil holders/make-up bags stuffed with pencils, lip balm, and other goodies are a gift I would love so I think they will be a hit with the teachers. Plus this project uses up scraps, have I mentioned before how much I love that? I only purchased zippers for this project, making this a very affordable gift.

I found a tutorial online, and decided to spend my time on the design. This tutorial uses iron on vinyl. Vinyl lining is great for a a make-up bag and recommended for a pencil bag, but if it is not readily available you can skip it. Mine is made of cotton and quilted so it can be thrown right into the washing machine. A previous gift of a personalized notepad with an apple design was the perfect inspiration for the make-up bag/pencil holder.
Perhaps you remember these fabrics from my Hawaiian potholders project?


Applique, embroidery, and echo quilting on the front,
Installing the zipper looks intimidating but is actually quite easy. You will want to plan out your design because assembling the bag is last and goes quickly!

 Quilting the back with a coordinating colored thread to adds to the uniqueness.

 A small pocket inside to stash your smaller valuables.

Make one for a teacher, mother, friend, or yourself. A monogram would be beautiful as well.
Stashed full of goodies and ready to give.

I plan to make one with cherries for car shows,... you know.... to stash my essentials. Lipstick, compact, band-aids, sunscreen, flask *wink wink.*
I love these cherries!


I'm on a roll, so I better start on the next gift for teacher. School is almost out!

Saturday, January 7, 2012

Pillow Talk

In my caffeine-induced frenzy yesterday, I whipped up two new couch pillows.  To make the covers, I found heavy cotton scraps left over from various sewing projects (ironing board cover, striped tote bag, plaid jumper, floral tablecloth for my daughter's playhouse).  The pillows themselves are feather-filled and perfect for sleeping in front of the tv.
 I used a basic pinwheel pattern from my quilt book, constructing four 2-piece triangles (per pillow) and then sewed the large triangles together.
The back opening is a simple overlap.  I cut two sides that extend to approximately 2/3 the full width of the pillow.  In this case the pillow measures 21" square, and the back sides are 16" wide.  I hemmed the opening edge.  The pillow stays tucked in nicely, and the cover can be removed for washing.  
No need for zippers or buttons!

Mission oak chair that my hubby reupholstered.
I also finished up a pair of pillows I made for my niece.  The fronts are knitted from chunky, chenille yarn and sewn to a fabric foundation.  The back is made the same as above.  These measure only 12inches square and worked up fast on size 17 needles!  Like knitting with wooden spoons!
These dandies should make some stellar marks on her face while she's sleeping!

Pillows make great gifts (I've done it several times).  So easy to find fabric and styles to match whomever you have in mind!  And in my case, pillows are like hotpads.  They get used to death and new ones are such a treat!

Sunday, December 4, 2011

Christmas Gifts-Victory Girl Style! Part 2


From left, Breadfruit, Protea, & Pineapple
Finishing the potholders has been a bit of a challenge, but that's what makes it fun, no? My last step was quilting down the outline. Once that was finished I got to work quilting down the inside.

This is not hard but tedious work that makes the potholder stand out! After completing the inside I stitched a few lines out side the design on the white background. My tip here is to put white thread on your machine but leave the red in the bobbin. This way there will be no contrasting stitching on the front or back.
I have come to the conclusion that I am way too much of a perfectionist to ever like binding. I would rather put in a zipper any day, BUT practice makes perfect, and lots of it I will have! My first attempt to bind a square potholder ended in a date between myself and the seam ripper. So rounding the corners seemed like a good solution. The binding went on much better. After washing out the blue marker here is my finished work!

Looks great, now the race is on to finish the other five before the Christmas Bake Sale!
Happy sewing gals!
I finished them with only a day to spare but here they are!
All tied up and ready to gift!

Saturday, November 19, 2011

Christmas Gifts- Victory girl style!

I am unsure of your timetables but mine go something like this- I work in two modes, #1 I have plenty of time I can do it later, and #2 I can't believe it's that time already! (picture me a mess here). I decided that although we have not yet passed up turkey day, I might enjoy being ahead on a project so tonight I will start them! I am going to make potholders. I would love to make these for all my friends and family, okay so maybe I better scale that back some. Two sets seems possible. One of them will be donated to school for the Christmas program and the other set...well I may have to keep it. Initially I dreamed up hawaiian quilted potholders in holiday colors, but I wanted something that could be used year round as well. A little internet browsing brought up three designs that could be done in holiday and everyday colors.  A trip to my local quilt store was in order since I would need not only my fabrics but the insulated batting. Printed out designs in hand, I ordered up a stack of colored cottons in the same pattern as to add to their cohesiveness. I'm a bit nutty that way.
Due to the fact that my scanner is on the fritz, I figured it would be easier to cut out some newsprint in an 8x8 block, fold it on the diagonal, and sketch the design out.

The breadfruit leave in green, protea in red, and pineapple in gold.
 My materials for this project are as follows- 12 blocks(8"x8") of each color, 12 blocks of insulbrite batting, 6 blocks of regular cotton batting, and 6 blocks of bleached muslin(background).
Next I placed my appliques on my white blocks and basted them down, however Heat n Bond works well too if you have some. In the interest of my sanity I will be machine quilting these, follow your machine's directions for the applique stitch.
Like lovely layers of a cake we have from top to bottom: color applique block, insulbrite, batting, insulbrite, and backing fabric. The insulbrite does have a "shiny" side that needs to face out and I included two layers so either side of the potholder could be used.

After removing the basting and pressing until perfectly flat, I used my french curve to draw out the quilting lines on the inside of my protea. After this I will not be pressing again until the blue lines have been washed out.
Lesson learned..again. Skipping steps does not always save time!
My alter ego, Wonder Woman, thinks she will finish these in one evening-yeah right! I attempted quilting  all those layers with four pins and no basting and now I will be spending some time with my seam ripper. The layers shifted, so I used alot of pins through out the layers. I also started at the top of the protea applique going down both sides instead of starting from the bottom, which eliminated the wrinkles you see on the right block.
Well Wonder Woman, it seems you and I will be spending another evening together to finish these. Assembly line sewing does seem to take much longer, but when you are finished you have six potholders!!

I hope you have started your handmade gift projects and may you get all of them done!

Stay tuned the the finishing of this project and coming soon, Part 2 of my dining room redo!

Sunday, October 23, 2011

Sunday Sewing

Seldom do I get to spend a majority of my day sewing, however October is swiftly passing me by and I need to catch up. What to pick first? I have a variety of projects, mending, apron challenge, a quilt, pillow, etc. that have been calling me from my disaster of a sewing room.

Quilt, t-shirt pillow, apron, and two mending projects
 So a rainy Sunday is the perfect time to reduce the pile. The sewing machine migrated out to the dining room so I didn't have to clean up before even starting. That would be another days project. Instead, I dive in and start with the apron that I started at the beginning of the month. Taking the apron challenge seemed like the best thing to do since I have lots of idle time on my hands, wait...WHAT? I am insane, well at least I'm havin' fun right? So I decide for the October apron I would go novelty fabrics, something I don't often do, and make a fun spirited one.

I chose Andy Kaufman for the black background, and a yellow fern print for the moon. I decided to embroider my name on it as well and add some vintage rick rack for a balance of yellow to black. Head on over to Willow Homestead to check out the results and join the challenge too!
Next up was two mending projects, both easy fixes but time consuming none the less. The first one was repairing my homemade shopping bags. Apparently they get way more use than I anticipated and it will be nice to have it back in service.
The second one was for my father who seam ripped open his couch cushions to take out the stuffing so he could wash them. Two months later, the Velcro I promised him is put on so he can return his throw pillows to his couch. Now to track him down to return them, that's the hard part!
Third was working on a quilt that my mother and I are making for my pregnant sister-in-law. She is due in January but I plan to do hand quilting so I should have started sooner no doubt. Ah well, my mother returned the finihed back and I finished the design for the center front today.


Perfect for pictures- just add baby.
 Next up will be a trip to the quilt store to get some batting and thread. I do look forward to curling up on the couch evenings and working on this quilt.
Last is the t-shirt pillow which I ran out of time to start, but that's life. I did get a good bit of my sewing to-do's done today so I am happy. Now time to rest, there are many more sewing projects for the week, including last minute costumes!

Tuesday, August 9, 2011

World's Fair in the 1940s

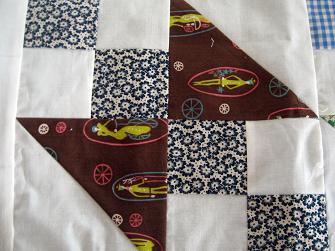
Well, technically there wasn't a World's Fair in the 1940s (given the War and all), but folks were still a buzz from the 1939 fairs that were held in New York and San Fransisco.  When I came into a collection of fabrics dating back to the 1930s, I wanted to choose a classic block pattern for my quilt.  This is a variation of the World's Fair block.  Quilts then were typically done with muslin backgrounds and rows of repeating blocks.
 So out came all my muslin scraps.  I used white and off-white together on purpose in an effort to make it look more authentic.  Must make do!
I did have to use some reproduction fabrics but I dare you to tell me which is which!
Some of the prints dated in the 1950s, but the overall feel, when mixed together, was perfect.
So after 64 blocks (measuring 8" square) and a narrow border to finish it off, I was very happy with the results.
And now that the piecing is done, I'm onto the quilting.  And maybe I'll even make matching pillowcases with the teensy tiny scraps I saved.  Happy Quilting Everyone!